-----------------------------------------------------------------------------------------------------------------------------
Contact No : 7600044051
E-Mail : rupareleducation@gmail.com
How to Install, Configure and Use GIT on Ubuntu?
Step 1: Open the Terminal and type sudo apt-get install git
Step 2: Goto www.github.com and sign into your account. If you’re a new user, you
can simply sign-up. (You can also use www.bitbucket.org as an alternative,but we will use github here).
You’ll have a username from here. Let us say that it’s your_username
CONFIGURING GIT:
Step 1: Go back to the terminal and type this to configure git
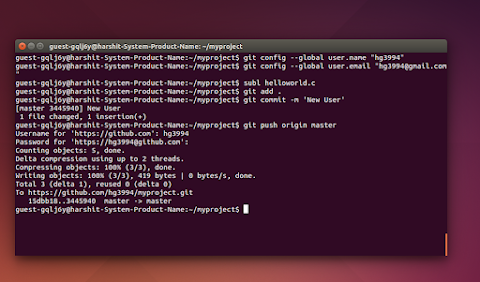
git config –global user.name “your_username”
Step 2: Now type this to link your email too.
git config –global user.email “your_emailid”
USING GIT:
Step 1: Go to your github account and create a repository
with a name(lets say name of your project). We are creating a repository with
the name myproject
Step 2: Make a folder with the name of your project and
change your current directory to that directory.
mkdir myproject
cd myproject
Step 3: Now we want to initiate Git for this folder
git init
Step 4: Now we will set up the remote, which tells git where the
repository is located.
git remote
add origin https://github.com/your_username/myproject.git
We have now configured and installed git
and, created and configured a repository. Lets say we have a simple file in the
myproject folder helloworld.c and we want it to share it with a friend who is
working on the same project.
Step 5: To add this file we will type
git add helloworld.c
Or if we have a lot of files to be
transferred from the folder to our git account, then we can use the command.
git add .
This would transfer the file(s) in the list
which we will later commit.
Step 6: Next, when we are finished adding the files, then
we will have to commit adding.
git commit
-m ‘your_message’
Step 7: Next, we need to push the commit that we just made
on to the repository at github
git push
origin master
It would automatically ask you for your
username and password for github. After entering the details, go to github and
refresh. The files would get added there.
Username
for ‘ https://github.com ‘:
your_username
Password
for ‘ https://your_username@github.com ‘ : *******
Step 8: We have successfully transferred a file on your github
account. Now lets add one more file aboutme.txt and edit our file helloworld.c
. Following the same procedure we will first add the files, commit and then
push them to the github account.
git add .
git commit -m ‘your_message’ git
push origin master
Step 9: When we would go to our github account, we would see the
entire hierarchy of the modification of the file. Here,we would see the changes
we made to the helloworld.c file in the respective commits.
Now, Lets say one of the co-worker of the
project needs to work on helloworld.c . After making some changes, he wants to
update the file on github.
Step 10: First
he would have to download the whole repository in which the file helloworld.c
is present into his system.
git
clone https://github.com/your_username/myproject.git
A folder named myproject gets downloaded
with all the files in it. The necessary changes are made and then the file is
similarly added, committed and pushed similarly as above.
Step 11: If
the first user wish to see the changes, then he can see it by typing:
git pull
origin master
Please Share and Like it...


